(Click here to download the PDF version of this guide)
Getting Started
How to Add Video to Your LegalMatch Profile
This guide provides step-by-step instructions to assist you in adding an introduction video to your LegalMatch profile. When you submit and upload an introduction video, a Key Account Manager reviews the video to ensure all the suggested talking points are covered.
A successful and approved video meets the following criteria:
- Good Video Quality
- Good Lighting
- Clear Audio
- 60-90 seconds long; however, you have the option to record a video up to 10 minute
If your video is declined, you will be notified of the reasons for this and have an opportunity to re-record for another submission. You may also contact your KAM for tips or advice as needed.
Important Talking Points
Be sure to include the following details in your introduction video:
- Name, Firm/Practice Name, and Location
- Years of Experience
- Are Free Consultation Offered?
- Applicable Categories of Law
- Reason for Practicing Law
- Direct Call to Action
Attorney Success Story Video
If you have recorded a LegalMatch “success story” video for our YouTube channel, please note:
- The success video from YouTube is the default display if there is no self-recorded/uploaded video.
- If both YouTube and self-recorded video are uploaded, the self-recorded video will be prioritized for display.
Where to Add Video
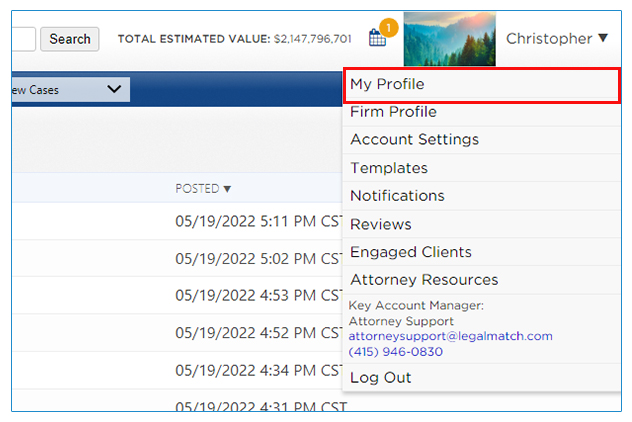
1. Log in to your account

2. In your account, go to My Profile
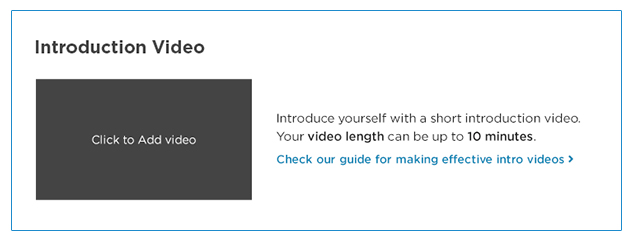
3. In the Introduction video section, a black screen is Select “Click to Add Video” to:
- Record a new video; or
- Upload a new video.
-
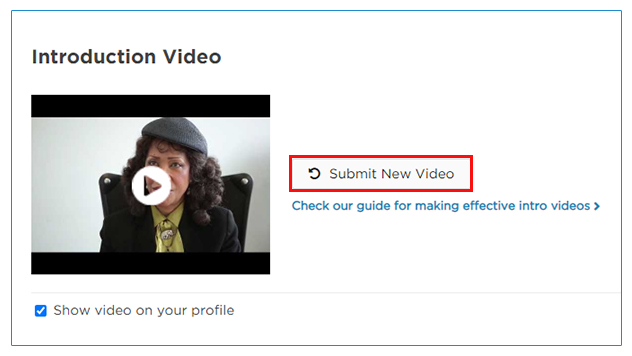
- If you have an existing YouTube video that LegalMatch created for you, it will be the default video displayed on the Introduction Video section; or
- You can create another video by clicking the Submit New Video button.
- If you choose not to display your YouTube video, uncheck “Show video on your profile.”
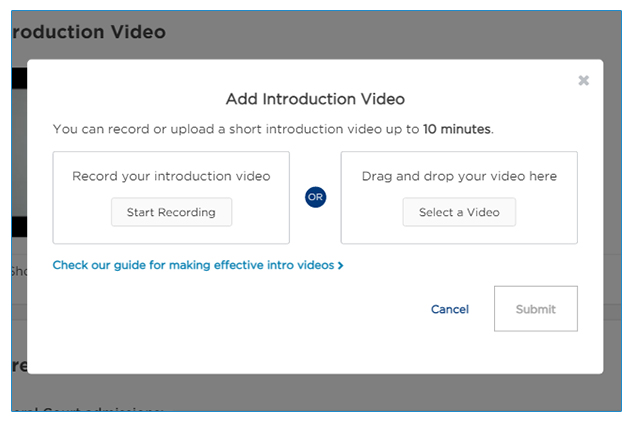
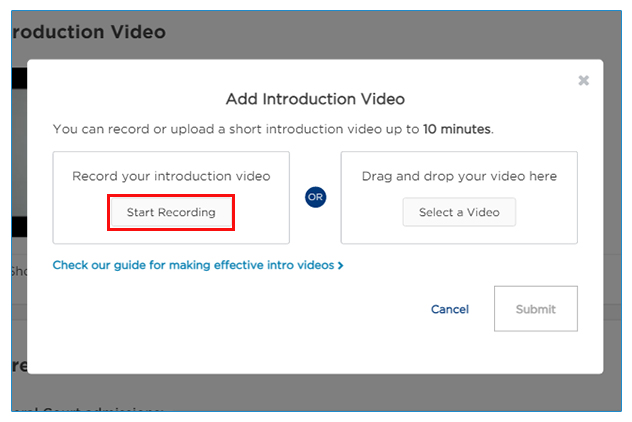
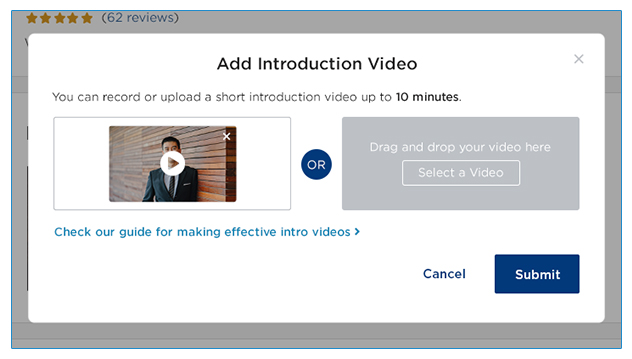
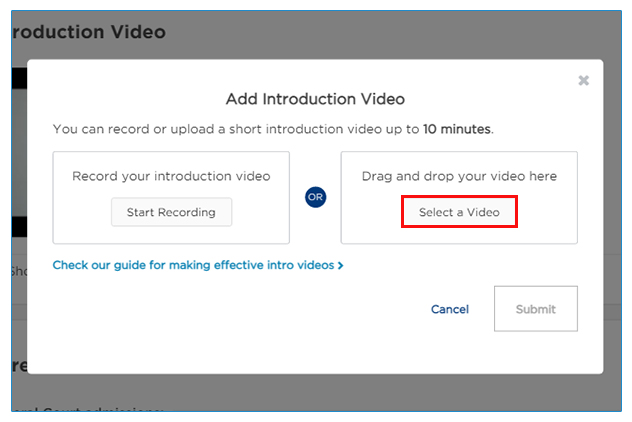
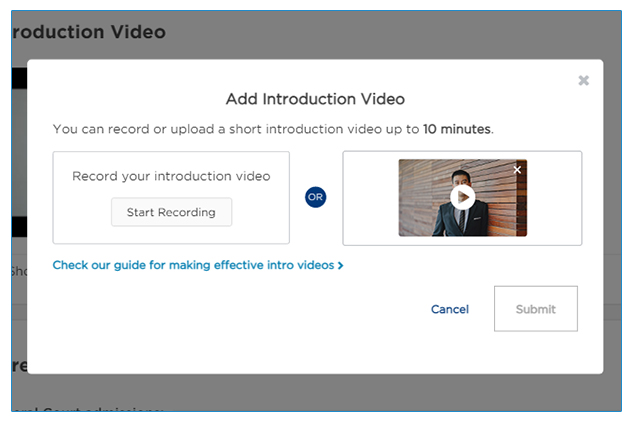
4. In the Add Introduction Video pop-up box, you can do the following:
- Record a new video; or
- Upload an existing introduction video from your computer/laptop.
-
How To Record Video
1. In the Add Introduction Video pop-up, click the Start Recording button.
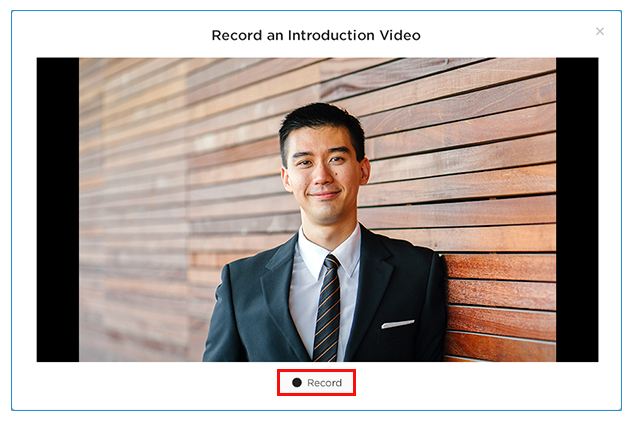
2. In the Record an Introduction Video pop-up, click the Record button.
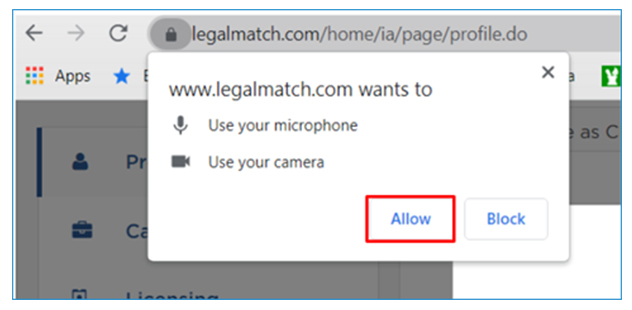
3. If this is your first time recording a video, the system may prompt you to allow the device’s microphone and camera. Click the Allow button.
4. While the video is recording, you may Pause and Resume it.
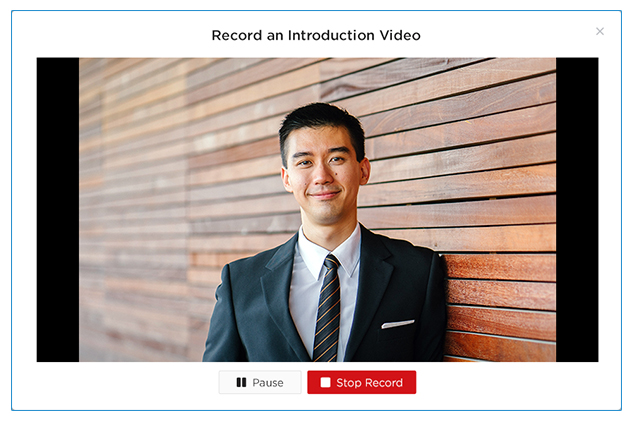
5. Once you’re done recording, click the Stop Record button.
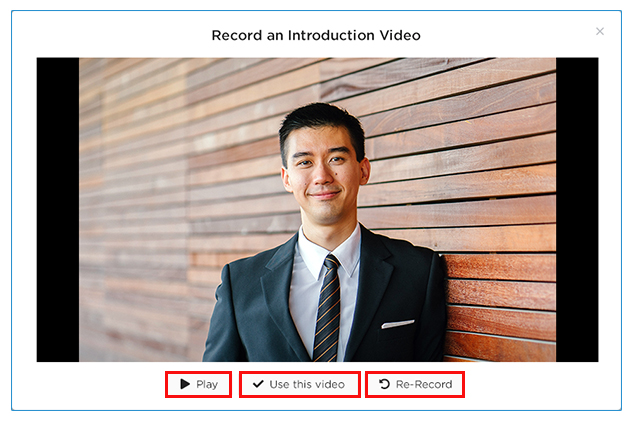
6. You have the following options once you’ve stopped recording:
- Play – check the video that you have recorded;
- Use this video – submit the video that you have recorded; or
- Re-Record – record another video.
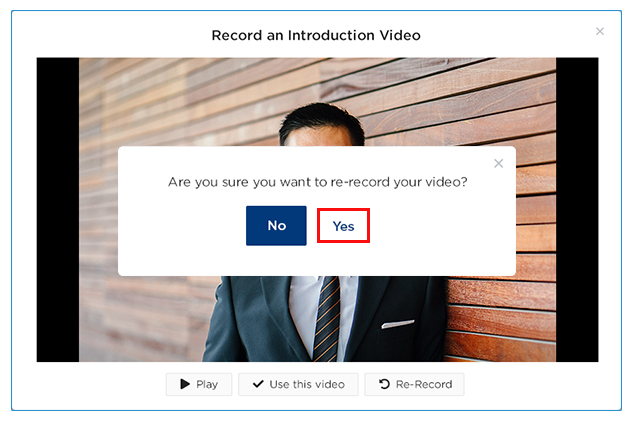
7. To re-record the video, the recording will begin once you click Yes on the confirmation pop-up.
8. If you want to use this video, you will be directed to the Add Introduction Video pop-up where you can choose to Submit or Cancel by clicking on the corresponding button.
- Click Submit to confirm.
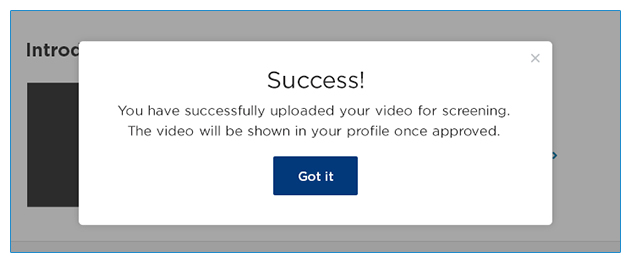
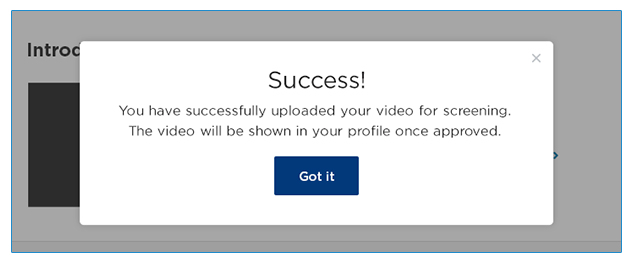
- The “Success!” Pop-up will appear. Click Got it to confirm.
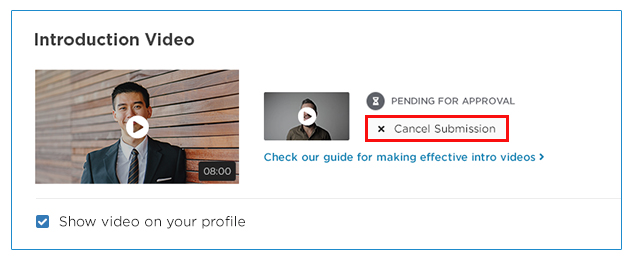
9. In the Introduction Video section of your profile, you’ll see the video submitted. The status will reflect PENDING FOR APPROVAL.
- A Key Account Manager will review to Approve or Decline the video.
- You can cancel the video submitted before it is Approved or Denied by clicking the Cancel Submission button.
-
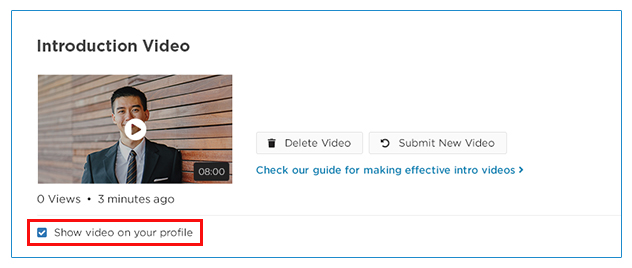
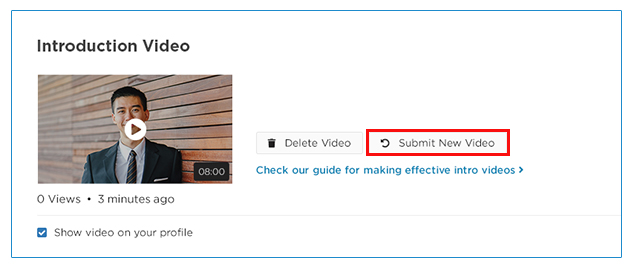
10. Once the video is Approved, it will appear in the Introduction Video section in your Profile settings.
- At any time, you will have the option to delete the video or submit a new video by clicking Delete Video and Submit New Video buttons respectively, at any time.
- Once you Delete an uploaded video, the existing YouTube Video (if you have one) will be automatically displayed.
- If you choose not to display your YouTube video, uncheck “Show video on your profile”.
-
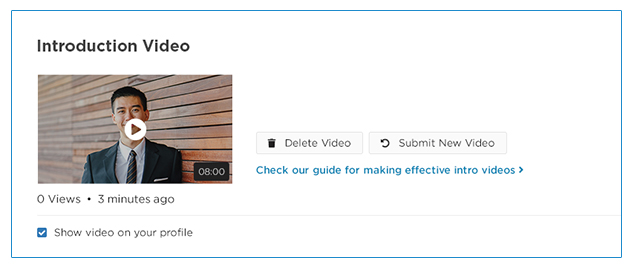
11. Check the box beside the Show video on your profile so the video will be shown on your profile page and your prospective clients can view it.

12. If your video is declined, you will see the following:

- Upon clicking the link, a pop-up panel will display Reason(s) Why The Video Was Declined.
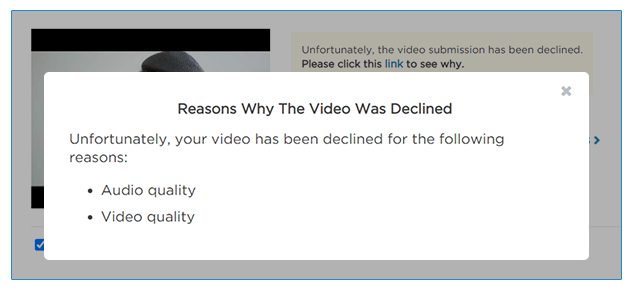
If your video was Declined:
- You may re-record and re-submit a new video by clicking Submit New Video.

Note: For Tips to Recording, click the Check our guide for making effective intro videos link.
How to Upload Video
1. In the Add Introduction Video pop-up, click Select a Video.
2. Select the video file that you want to
- Allowed video formats: 3gp, mov, mp4, mpeg, mpg, ogg, webm, wmv
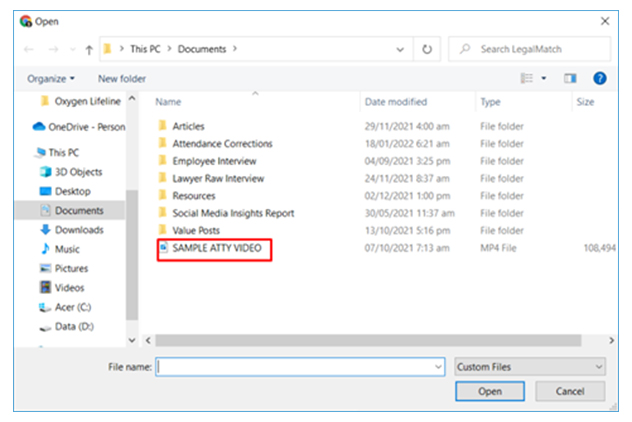
3. In the Add Introduction Video pop-up, click the Play Icon to ensure you have selected the correct video.
4. Click Submit
5. Click Got it in the “Success!” pop-up.
6. In the Introduction Video section of your profile, you’ll see the video submitted. The status will reflect .
- A Key Account Manager will review to Approve or Decline the video.
- You can cancel the video submitted before it is Approved or Declined by clicking the Cancel Submission button.

7. Once the video is Approved, it will appear in Introduction Video section in your Profile settings.
- At any time, you will have the option to delete the video or submit a new video by clicking Delete Video and Submit New Video buttons respectively, at any time.
- Once you Delete an uploaded video, the existing YouTube Video (if you have one) will be automatically displayed.
- If you choose not to display your YouTube video, uncheck “Show video on your profile.”

8. Check the box beside the Show video on your profile so the video will be shown on your profile page and your prospective clients can view it.
If your video is declined, you will see the following:

- Upon clicking the link, a pop-up panel will display Reason(s) Why The Video Was Declined.
If your video was Declined:
- You may re-record and re-submit a new video by clicking Submit New Video.
Note: See tips by clicking the Check our guide for making effective intro videos link on your profile page.
For iPhone Users
Your iPhone lets you record videos and Quick. Take videos using the Camera App.
Note: When the Camera App is in use, a green dot appears in the top- right corner of the screen.
- Launch the Camera app on your iPhone or iPad.
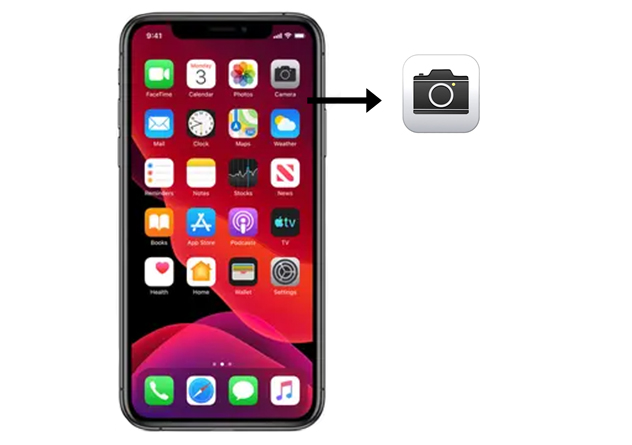
- Choose Video
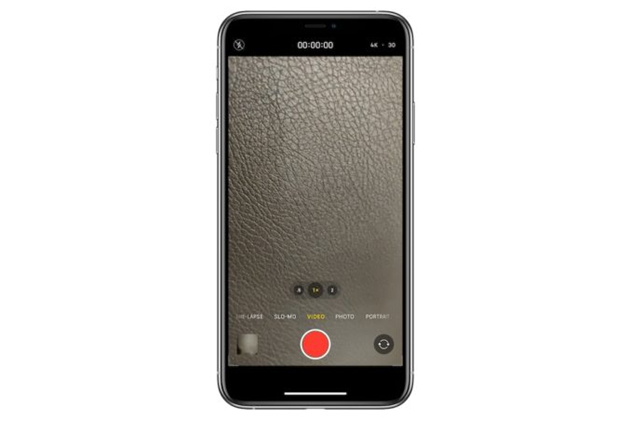
- Switch to the front-facing camera by tapping
 or
or  (depending on your model).
 - Tap the Record button or press either volume button to start recording.
Anything captured automatically is saved to your device’s Photo Library.
You can transfer the recorded videos from your iPhone to your computer through any of the following methods:
Mac Computer:
- Photos App AirDrop
Windows Computer:
- AutoPlay
- Photos App
- File Explorer
- iCloud
You’ll find instructions for each method on the following pages.
File Transfer: iPhone to Mac via Photos App
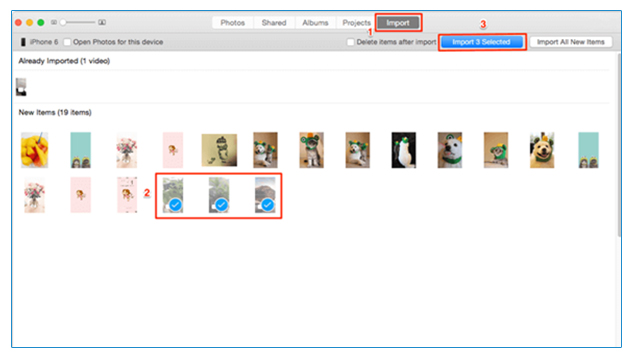
On a Mac computer, you can use the built-in iPhoto or Photos (Mac OS X 10.10.3 or later) app to import iPhone recordings (Videos taken by camera) by following these steps:
- Open Photos app on your Connect your iPhone to your Mac with a USB cable.
- Click Import, then Find and select photo videos you want to import.
- Click the Import Selected option to begin the process.
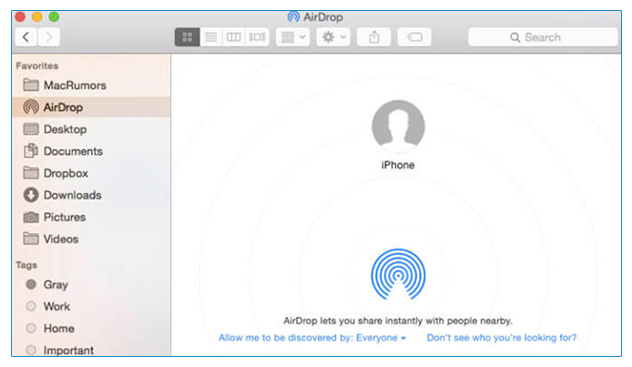
File Transfer: iPhone to Mac via AirDrop
AirDrop is a nice function that Apple Designed for iOS users to share files like photos, videos, etc. between Apple devices. Follow the steps below to do it.
- Turn on AirDrop on your Mac: Go to Finder > Go > AirDrop > Turn on Bluetooth and WiFi to enable the AirDrop feature on your Mac > Set the option Allow to be discovered by as Everyone.
- Turn on AirDrop on your iPhone iPad iPod touch: Swipe up from the bottom of your iPhone screen to launch the Control Center > Tap on AirDrop and set your iPhone to be discovered by Everyone.
- Open Photos on your iPhone and select the videos > Tap on share button > Tap on your Mac’s name after it shows > Receive the videos on your Mac.
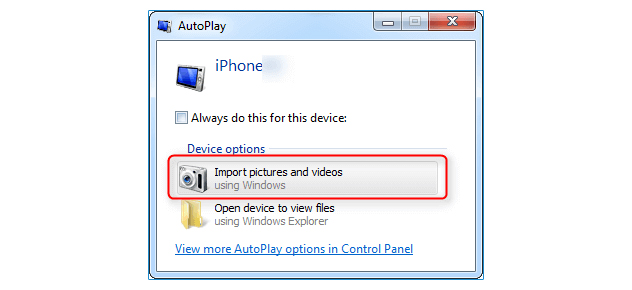
File Transfer: iPhone to PC via AutoPlay
The AutoPlay feature in Windows 7 allows users to import pictures and videos from smartphones to PC. Here are steps to use AutoPlay to get videos from iPhone to computer:
- Connect your iPhone to your PC and AutoPlay will show up automatically.
- In the AutoPlay window, click on the videos. Import pictures and videos.
- In the Import Settings, choose or create a folder to save the videos you’d like to transfer.
- Select the videos you want to Then click “Import” to get videos from your iPhone to PC.
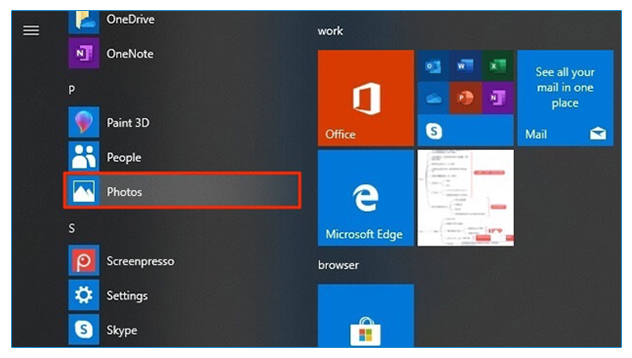
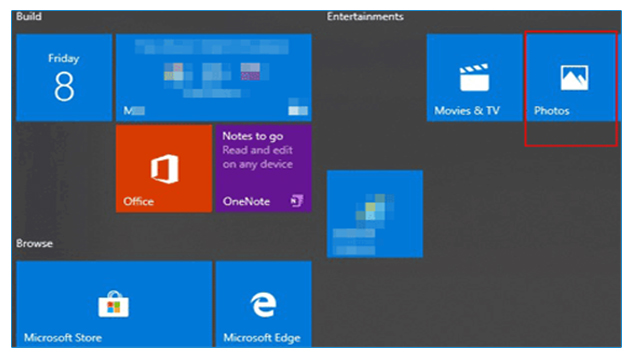
File Transfer: iPhone to PC via Photos App
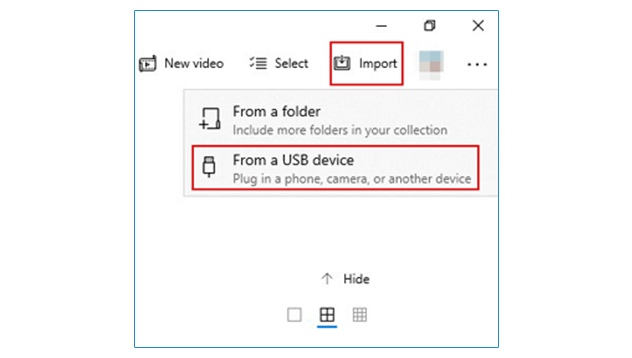
Windows Photos app makes it quite easy to import photos from new iPhone to PC and videos from your phone to your computer. Here are the detailed steps on how you can get videos from iPhone to PC with the Photos app:
- Connect your iPhone to the Windows PC via a USB cable
- Unlock your iPhone and tap on Trust on your iPhone
- Run Photos app from the Start menu if it doesn’t pop up.
- Under Import option select From a USB device
- It will start searching for videos and photos on your iPhone.
- Select the photos and videos you want to transfer, and set the import destination, then click Import Selected.
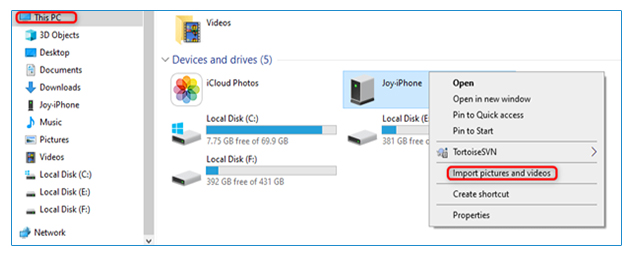
File Transfer: iPhone to PC via File Explorer
The File Explorer (called Windows Explorer in earlier versions) in Windows 10 also enables to you import videos from iPhone to computer. As long as your iOS device is recognized by your computer, you can get videos off your iPhone onto the computer via the USB connection.
- Connect your iPhone to PC with a USB cable
- Open This PC and find your iPhone
- Right-click your device name and then choose “Import pictures and videos”
- For Windows 10 users: Click Start > File Explorer > This PC
- You should see your iPhone name > Right-click it > click Import pictures and videos.
- Choose Review, organize, and group items to import > tap on Next to continue.
- Check the videos you want to copy to your PC and click Import to start transferring the selected videos.
File Transfer: iPhone to PC via iCloud
With Apple’s iCloud Photos feature, you can access your videos and photos from your iPhone on iCloud.com, and your PC. If you enable this feature on your iOS device, the photos and videos will be automatically added to iCloud Photos. Now, let’s check the steps to import videos from your iPhone to your PC or Mac computer.
Set up iCloud on both your iOS device and computer and signed in with the same iCloud
Connect your device to a stable Wi-Fi
Turn on iCloud Photos on your devices:
- On your Mac, go to System Preferences > iCloud. Click the Options button next to Photos, then select iCloud Photos.
- On your PC, download iCloud for Windows and follow the steps to set up iCloud Photos on your PC > Tap Done, and then click Apply. You can go to This PC > iCloud Photos > Downloads to access all the new photos from videos from your iPhone.
On your iPhone, go to Settings > [your name] > iCloud> Photos, then turn on iCloud Photos.
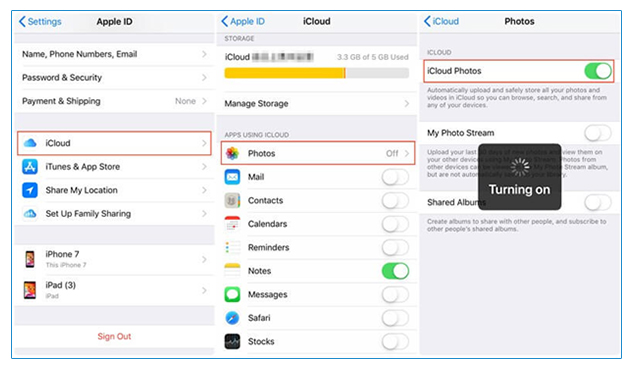
Now, all the photos and videos on your iPhone can be viewed on your Mac or PC computer.
For Android Users
- Tap Camera App
- To capture moving pictures, or video, with your Android phone, switch the camera mode in the Camera app to video The same icon is used to switch between still and moving images.
- When video mode is active, the Camera app’s screen changes subtly: The Shutter icon becomes a Record icon. Touch that icon to start recording the video.
- Aim then tap the Record icon
 to begin recording. The location of the camcorder icon differs depending upon the orientation of the device. When held in the standard upright (portrait) position, the icon is located in the lower-center position.
 - While video is being recorded, the Record icon changes to either a Pause or Stop icon
 . A timer appears on the touchscreen, indicating how long you’ve been recording video. Touch the Pause or Stop icon to pause or stop recording, respectively.
 - Tap the image preview located in the lower right to view the video.
Helpful Tips on Android
- Video recorded by the Camera app is kept on the phone’s internal storage. You can peruse videos by using the Gallery app, similar to a still image.
- The focus ring may not appear while you’re capturing video. Video recording uses the same zoom techniques as recording still images.
- Hold steady! The camera still works when you whip the tablet around, but wild gyrations render the video unwatchable.
- Video is saved in the MPEG-4 video file format and displays the .mpg filename extension.
- The .mpg files are found on the phone’s internal storage.
Transferring Files from Android
You can transfer the recorded videos from your Android smartphone to your computer using any of the following methods:
-
- USB
- Google Drive
- Bluetooth
You’ll find instructions for each method on the following pages.
File Transfer: Android to PC via USB
First, connect your phone to a PC with a USB cable.
- Turn your phone on and unlock Your PC can’t find the device if the device is locked.
- On your PC, select the to open the Photos app. Start button and then select Photos
- Select Import > From a USB device , then follow the instructions. You can pick the items you want to import and select where to save them. Allow a few moments for detection and transfer.
File Transfer: Android to PC via Google Drive
If you want to transfer videos from phone to computer wirelessly, Google Drive can be a good choice. Because every person has 15 GB of free storage space with a Google Account. As long as you have enough space to transfer videos, you can transfer them with Google Drive. However, the transferring speed relates to your Internet speed.
- Step 1. Install Google Drive and Sign in
Download Google Drive on your Android smartphone and launch the app. Then log in with your Google account. - Step 2. Upload Videos from Android to Drive
Sign into the app and tap on the “Add” (+) button to choose the “Upload” option. Then select “Gallery” from the categories.
Select the video that you want to upload from the Gallery. Tap on the “Upload” icon, then your videos will start to upload from Android device to Google Drive.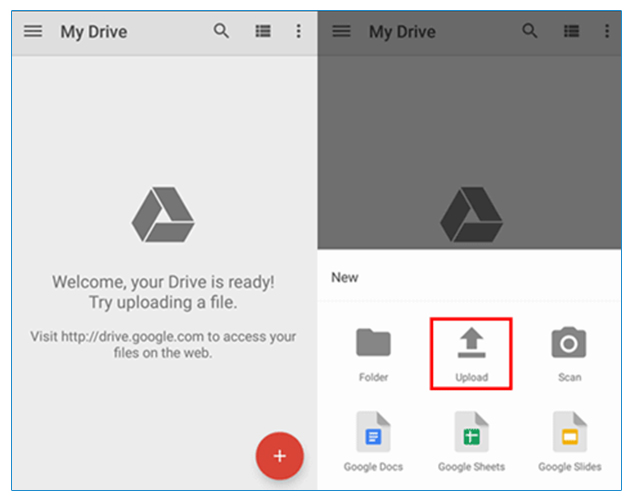
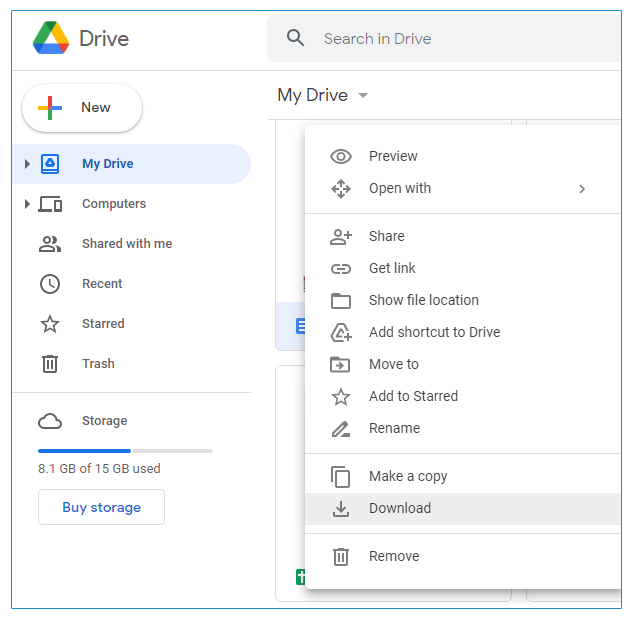
- Step 3. Log in to Google Drive on PC
On your computer, log in to the Google Drive using the same Google account. - Step 4. Download Videos from Google Drive to PC
Tap on the “Recent” option on the left. You will see the videos that you recently uploaded.
Right-click on your chosen video, then choose “Download” from the drop-down list.
File Transfer: Android to PC via Email
You can also transfer videos from Android smartphone to computer by sending it through email since most Android phones have a pre-installed email app.
- Step 1. Find Video Files
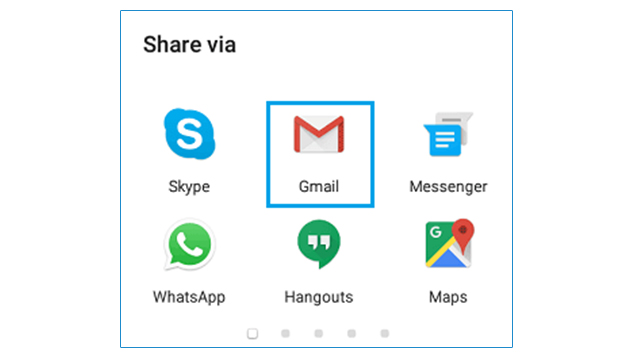
Select the video files that you want to transfer on your Gallery app. - Step 2. Send Videos to Mail
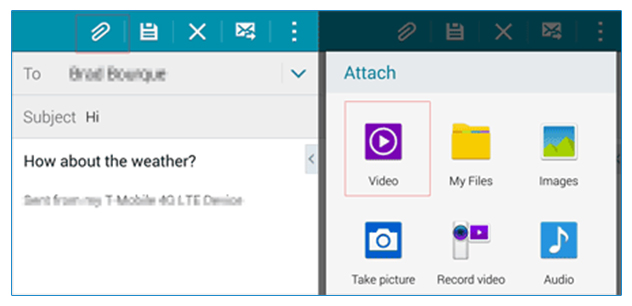
Tap on the video file, and you will see the “Share” icon at the the bottom menu bar. Click on it and then choose the “Mail” option. Here, we take Gmail as an example.
Type your e-mail address on your e-mail app, you can use the identical mail address on “From” and “To” items. Next, click the “Send” button.
- Step 3. Sign in your Mail Account on computer
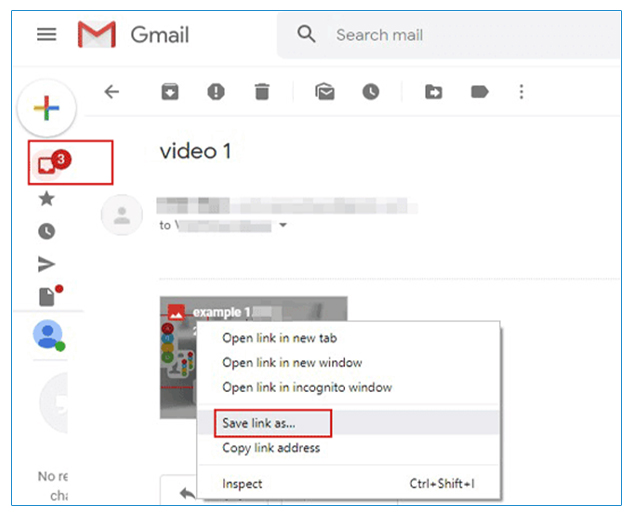
On your computer, open a browser and sign in to the same email account. You will see your video in the “Inbox” as an attached file.
Click the email and right-click on the video to select the “Save link as” option. You can select a location on your PC on the pop-up window. Then the video will be downloaded to the PC.
File Transfer: Android to PC via Bluetooth
Bluetooth is a built-in app on the computer and Android phone. Here are the steps on how to send videos from phone to computer by Bluetooth:
- Step 1. Turn on the Bluetooth on both devices
Turn on Bluetooth on both PC and Android devices. On the computer, tap on “Start” and “Settings“, then hit “Devices” on the window to choose “Bluetooth and other devices“. Turn on your Bluetooth.
On your Android device, swipe down from the top of your screen and touch the Bluetooth icon. - Step 2. Connect Android Device and PC via Bluetooth
On your PC, tap on “Add” icon on the interface, then choose “Bluetooth” Your PC starts to search for your Android phone. Once done, you will see your Android phone’s name on the list.
Click your Android device to pair or sync your phone and computer. - Step 3. Send Videos via Bluetooth
After pairing, select “Send or receive files via Bluetooth” and then choose “Receive a file” on PC.
On your Android phone, you can find your video files and click “Share” to choose “Bluetooth“. Tap on the name of your computer. If prompted, choose “Yes” on the cellphone. Wait until the videos have been successfully transferred to your computer.

Sample Video
Here’s a sample of an Introduction Video approved by Key Account Managers (KAM).
Meet Wills, Trusts, and Estates Attorney, Clarke W.

Content Checklist
Make sure to include the following talking points in your Introduction Video:
- Name, Firm/Practice Name, and Location
- Years of Experience
- Are Free Consultation Offered?
- Applicable Categories of Law
- Reason for Practicing Law
- Direct Call to Action
Please reach out to your Key Account Manager (KAM) for any additional questions. You’ll find your KAM’s contact information in the top right-hand corner of your LegalMatch member site.
You may also download the PDF file of the whole How to Add a Profile Video (Attorney Guide).
We look forward to watching your introduction video!

